Easy St. Patrick’s Day Cookies
There’s something utterly delightful about the aroma of baking cookies wafting through the air—a warm embrace that invites everyone in. As the oven works its magic, bright hints of sweet creamy green emerge, reminding you that St. Patrick’s Day is just a sprinkle of flour away. Picture a festive afternoon, bustling with laughter, the pitter-patter of little feet eager to help. Cozying up in your kitchen, you prepare for a spirited treat that embodies all the joy of this Irish celebration. Their color alone sparks excitement, promising a delicious twist on a familiar favorite.
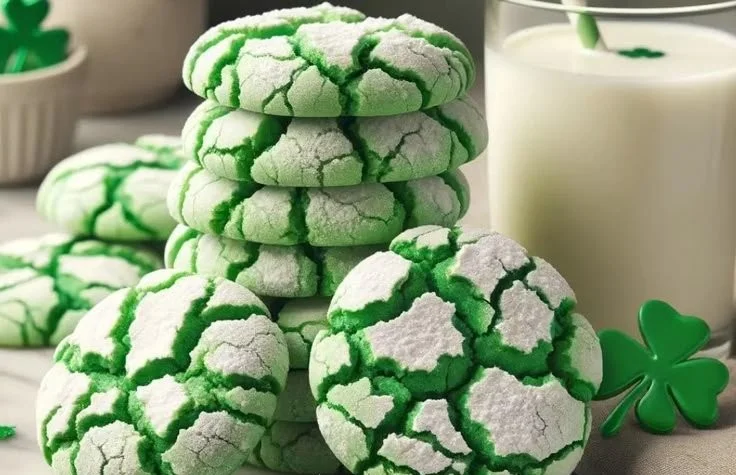
When you finally sink your teeth into these Easy St. Patrick’s Day Cookies, pure bliss unfolds. The tender, pillowy texture dances on your tongue, while the subtle sweetness leaves you craving just one more. What’s more, the contrast between the velvety dough and the delicate crunch of the sugar coating makes every bite an adventure. Sprinkle in a hint of festive spirit, and you have a cookie that delivers in both flavor and fun.
Why You’ll Love This Recipe
These Easy St. Patrick’s Day Cookies are not just about celebration; they are a heartfelt way to bring friends and family together, evoking laughter and nostalgia with every munch. Easy to whip up and irresistibly charming, they occupy a special place in your heart and on your table. Perfect for parties, classroom celebrations, or even a quiet night in, this treat bursts forth in cheerful green, captivating eyes and taste buds alike.
Distinctively soft yet slightly crunchy, the cookies boast a creamy sweetness that pairs exceptionally well with a cup of hot cocoa or a frothy Irish cream coffee. Their vibrant hue creates an instant festive vibe, drawing everyone closer to share a moment of bliss. Not to mention, the straightforward preparation means even novice bakers can impress their friends.
Preparation Phase & Tools to Use
The beauty of this recipe lies in its simplicity and the minimal tools needed. Gather your essentials:
- Mixing Bowls: A large mixing bowl holds the key ingredients, while smaller bowls are perfect for separating your sugars.
- Baking Sheet: Use a reliable, non-stick baking sheet, preferably lined with parchment paper to ensure easy removal of your precious cookies.
- Cookie Scoop: A tablespoon-sized scoop forms even-sized dough balls, ensuring consistent baking.
- Whisk or Spoon: Whisking together your ingredients brings them together into a fluffy blend, ideal for rolling.
Practical tip: Chill the dough! The time spent in the refrigerator allows the flavors to meld beautifully, making for a perfectly textured cookie that expands beautifully during baking.
Ingredients for Easy St. Patrick’s Day Cookies
- 1 box (15.25 oz) white cake mix (about 3 cups): This is the backbone of your cookie—easy, sweet, and the perfect canvas for your green magic.
- 2 large eggs: They bring moisture and binding power, creating that luscious texture that melts in your mouth.
- 1/3 cup vegetable oil: Oil offers a lighter, chewier bite than butter, keeping the cookies tender.
- 1/4 teaspoon Kelly green gel food coloring: This vibrant color steals the show, making your cookies an enticing treat.
- 3 tablespoons granulated sugar: A light crunch and sweetness grace the exterior of your cookies.
- 6 tablespoons powdered sugar: This snowy blanket finishes off the cookies flawlessly, adding an extra layer of sweetness and intrigue.
Consider substitutions such as coconut oil for a vibrant flavor or gluten-free cake mix to accommodate dietary restrictions.
How to Make Easy St. Patrick’s Day Cookies
-
Start by gathering a large mixing bowl and combine the white cake mix, eggs, and vegetable oil. Mix thoroughly until a sticky dough forms. This might require a bit of muscle, but the reward is worth it!
-
Add color: Introduce the Kelly green gel food coloring into the dough and blend until you achieve a delightful, even hue.
-
Chill: Wrap the mixing bowl with plastic wrap and place it in the refrigerator for 30 minutes. This step ensures the cookies maintain their lovely shape during baking.
-
Preheat: When the time is up, preheat your oven to 350°F (175°C) and prepare your baking sheet by lining it with parchment paper.
-
Set up your sugar stations. Pour granulated sugar into one bowl and powdered sugar into another. This two-step sugar coating is crucial for that satisfying texture!
-
Using a tablespoon-sized cookie scoop, portion out the chilled dough. Roll each scoop into a beautiful ball between your palms, ensuring your hands stay dusted with a light layer of granulated sugar.
-
Coat: Roll each dough ball in the granulated sugar until completely coated, then dip it into the powdered sugar, encasing the ball in a sugary embrace that promises to crackle and delight.
-
Place your sugar-coated dough balls on the prepared baking sheet, spacing them about 2 inches apart. This gives them room to spread.
-
Bake: Pop them in the oven for 9-12 minutes, watching as they transform into beautiful, crackled delights.
-
Once done, allow them to cool on the baking sheet for 5 minutes before transferring to a wire rack to cool completely.
-
These cookies store exceptionally well; keep them in an airtight container at room temperature for up to 5 days or freeze them for future enjoyment.
Chef’s Notes & Helpful Tips
For busy bakers, make ahead by storing your dough in the refrigerator for up to 3 days before baking. Alternatively, you can freeze the rolled balls and bake them straight from the freezer—just add a minute or two to the baking time.
If you’re feeling adventurous, try experimenting with different colors of gel food coloring for various occasions or seasonal celebrations.
Common Mistakes to Avoid
-
Forget to chill the dough: Skipping this step can lead to flat, unappealing cookies. Always give them time to chill!
-
Using too much or too little food coloring: Measure carefully; too much can affect the dough consistency, while too little diminishes that eye-catching allure.
-
Not spacing the cookies properly: Allow space for them to expand; crowded cookies result in a massive baked treat rather than individual delights.
What to Serve With Easy St. Patrick’s Day Cookies
- Coffee: A rich brew pairs perfectly with the sweetness of the cookies.
- Milk: The classic pairing never fails, emphasizing the creamy texture.
- Hot Cocoa: For the ultimate cozy experience, serve these cookies alongside a piping cup of chocolatey goodness.
- Irish Cream Liqueur: Elevate your indulgence with a splash of Irish cream for adults.
- Vanilla Ice Cream: A scoop melts beautifully beside the warm cookies.
- Fruit Garnish: Fresh berries add both a pop of color and a refreshing contrast to the sweetness.
- Tea: Their lightness matches well with a flavorful cup of herbal or black tea.
- Cheese Plate: Compliment the sweetness with tangy cheeses for a sophisticated touch.
Storage & Reheating Instructions
Store your cookies in a sealed container at room temperature for up to 5 days, maintaining their delightful texture. Alternatively, freeze them for longer-term enjoyment—just ensure they’re well wrapped to avoid freezer burn. For reheating, a brief 10 seconds in the microwave revives the soft, gooey goodness, ensuring they taste as fresh as the day they were made.
Estimated Nutrition Information
Approximate values per cookie (based on a yield of 24 cookies):
- Calories: 150
- Total Fat: 7g
- Saturated Fat: 1g
- Total Carbohydrates: 20g
- Sugars: 8g
- Protein: 1g
Disclaimer: Values may vary based on specific brands and ingredients used.
FAQs
1. Can I use a different cake mix?
Absolutely! Chocolate or lemon cake mixes can create delightful variations. Just remember to adjust the food coloring for the desired effect!
2. How can I make these cookies gluten-free?
Opt for a gluten-free cake mix, and you’ll have delicious cookies that everyone can enjoy.
3. Is there an alternative to vegetable oil?
You can use coconut oil or melted butter for added flavor, but adjust the quantity slightly to maintain the texture.
4. Can I freeze the dough?
Yes! Roll the dough balls and freeze them for future baking. Just add a minute or two to the baking time when you’re ready to enjoy them.
5. How do I ensure my cookies stay soft?
The secret lies in the chilling process—don’t skip it! Also, keeping cookies in an airtight container helps retain their soft texture.
As the chapter of your baking journey unfolds, these Easy St. Patrick’s Day Cookies stand out, brightening any festive occasion with their joyful spirit. Cozy up your kitchen, invite loved ones over, and roll up those sleeves. With just a handful of ingredients and a sprinkle of joy, these delightful cookies will surely become a cherished tradition. Bake, share, and enjoy—the luck of the Irish is surely with you!
Print
Easy St. Patrick’s Day Cookies
- Total Time: 42 minutes
- Yield: 24 cookies 1x
- Diet: Vegetarian
Description
Delightful cookies that bring festive cheer with vibrant green color and creamy sweetness, perfect for St. Patrick’s Day celebrations.
Ingredients
- 1 box (15.25 oz) white cake mix (about 3 cups)
- 2 large eggs
- 1/3 cup vegetable oil
- 1/4 teaspoon Kelly green gel food coloring
- 3 tablespoons granulated sugar
- 6 tablespoons powdered sugar
Instructions
- Gather a large mixing bowl and combine the white cake mix, eggs, and vegetable oil. Mix thoroughly until a sticky dough forms.
- Add the Kelly green gel food coloring into the dough and blend until you achieve a delightful, even hue.
- Wrap the mixing bowl with plastic wrap and place it in the refrigerator for 30 minutes.
- Preheat your oven to 350°F (175°C) and prepare your baking sheet by lining it with parchment paper.
- Pour granulated sugar into one bowl and powdered sugar into another.
- Using a tablespoon-sized cookie scoop, portion out the chilled dough and roll into balls.
- Coat each dough ball in granulated sugar, then dip in powdered sugar.
- Place the sugar-coated dough balls on the prepared baking sheet, spacing them about 2 inches apart.
- Bake for 9-12 minutes.
- Allow them to cool on the baking sheet for 5 minutes before transferring to a wire rack.
Notes
For busy bakers, dough can be stored in the refrigerator for up to 3 days or frozen for future baking. Ensure to chill dough before baking.
- Prep Time: 30 minutes
- Cook Time: 12 minutes
- Category: Dessert
- Method: Baking
- Cuisine: Irish
Nutrition
- Serving Size: 1 cookie
- Calories: 150
- Sugar: 8g
- Sodium: 100mg
- Fat: 7g
- Saturated Fat: 1g
- Unsaturated Fat: 5g
- Trans Fat: 0g
- Carbohydrates: 20g
- Fiber: 0g
- Protein: 1g
- Cholesterol: 40mg
Keywords: St. Patrick's Day, cookies, baking, festive treats, easy cookies