Nobake chocolate eclair cake recipe combines creamy layers
Easy No Bake Chocolate Eclair Cake
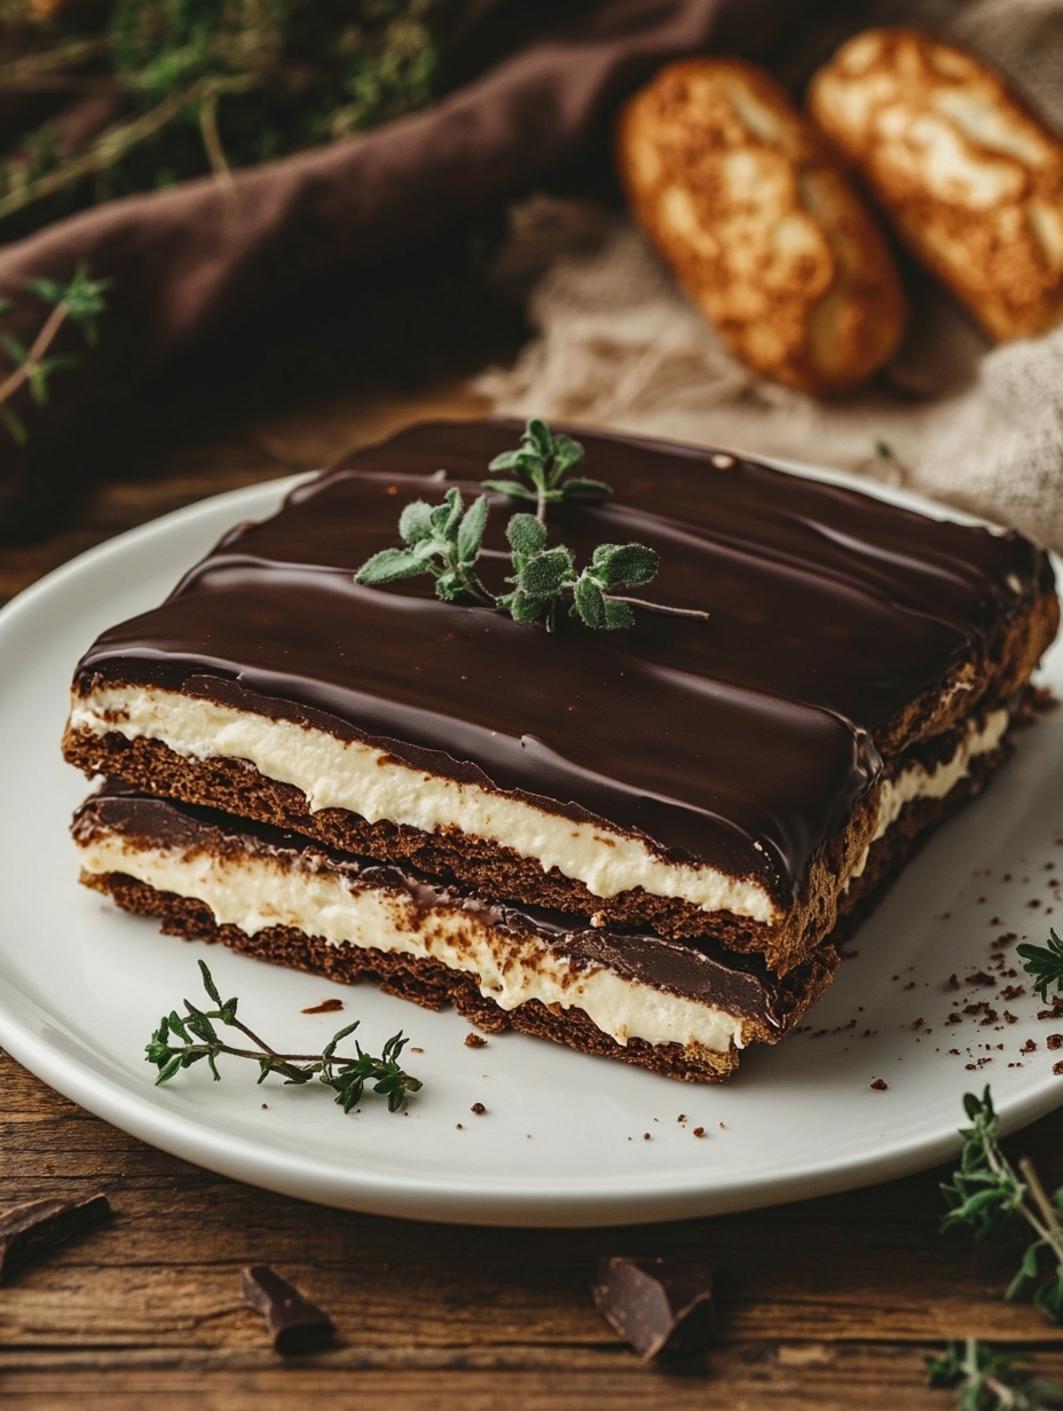
If you’re looking for a dessert that delights without the fuss of time-consuming baking, then this Easy No Bake Chocolate Eclair Cake is perfect for you. This no-bake wonder combines the rich flavors of chocolate and creamy vanilla pudding layered between graham crackers, creating a dessert that’s both easy to prepare and impressively delicious. Perfect for potlucks, birthday parties, or simply a sweet treat at home, this recipe offers a delightful fusion of textures and flavors every bite. In addition to being a hit at gatherings, this cake is readily customizable. You can add toppings, layer different flavors, or even throw in fruits for added freshness. The best part? No baking required! Let’s dive deeper into this scrumptious recipe, uncover its advantages, and get you all set to make it.5 Reasons To Love No Bake Chocolate Eclair Cake
1. **Time-Saving Delight**: With a prep time of just 20 minutes, this dish allows you to enjoy dessert without spending the entire afternoon in the kitchen.
2. **No Baking Required**: For those who may shy away from baking, this recipe is the perfect solution. It’s straightforward, requiring no oven, yet delivers gourmet-level satisfaction.
3. **Customizable**: The beauty of this cake lies in its versatility. You can swap out chocolate pudding for vanilla, add fresh fruit, or use different cookies to suit your taste.
4. **Crowd-Pleaser**: It’s hard to resist such a decadent dessert! This cake is guaranteed to impress your friends and family, making it a fantastic choice for gatherings.
5. **Easy Cleanup**: Minimal pots and pans are needed, which means less time cleaning up after your culinary creation.
Ingredient Deep-Dive
To successfully create this Easy No Bake Chocolate Eclair Cake, you will need a few simple ingredients. Let’s explore them in detail:– **Graham Crackers**: These are the base of your cake, providing a crunchy texture that mimics traditional eclair pastry. Opt for a honey or cinnamon variety for an extra flavor twist.
– **Chocolate Pudding Mix**: Choose instant pudding for this recipe. The chocolate flavor is rich, adding a delightful layer to contrast the creamy filling.
– **Vanilla Pudding Mix**: This brings a smooth, creamy flavor that balances the richness of chocolate.
– **Milk**: Essential for preparing both the chocolate and vanilla pudding, milk adds a creamy texture to your cake.
– **Whipped Topping**: Used to lighten the pudding mixture, whipped topping enhances the cake’s creamy consistency. Substitute with homemade whipped cream for a fresher alternative.
– **Chocolate Syrup**: This indulgent drizzle on top not only makes the cake visually captivating but brings an extra chocolatey burst. With these ingredients on hand, you’re well on your way to making an unforgettable dessert.
Step-by-Step Instructions
Now, let’s get into the nitty-gritty details on how to prepare this delectable cake.1. **Prepare the Pudding**: In a large mixing bowl, whisk together 2 cups of cold milk with the chocolate pudding mix as per the package instructions. Repeat the same in a separate bowl for the vanilla pudding mix. For both, let sit for about 5 minutes until thickened.
2. **Combine the Puddings**: Gently fold half of the whipped topping into each pudding mixture until well combined. This step lightens each pudding and blends perfectly for layering.
3. **Layer the Cake**: In a 9×13-inch dish, start creating your layers. Lay down a single layer of graham crackers on the bottom of the dish. Spread half of the chocolate pudding mixture over the graham crackers, then add another layer of graham crackers followed by half of the vanilla pudding mixture.
4. **Add More Layers**: Continue the layering process by adding another layer of graham crackers, topping it with the remaining chocolate pudding, and another layer of graham crackers, finishing with the vanilla pudding on top.
5. **Chill the Cake**: Cover with plastic wrap and refrigerate for at least 4 hours, preferably overnight. Allowing it to set helps soften the graham crackers and enhance flavors.
6. **Add Toppings**: Just before serving, spread the remaining whipped topping over the top layer and drizzle with chocolate syrup for an eye-catching finish.
7. **Serve**: Slice into squares and enjoy the magnificent layers of creamy goodness and crispy graham crackers.
Pro Tips for Success
To ensure your No Bake Chocolate Eclair Cake turns out perfectly, consider the following pro tips:– **Use Instant Pudding**: Make sure to use instant pudding; it reaches its optimal consistency without the need for cooking.
– **Chill Overnight**: While a minimum of 4 hours of refrigeration is sufficient, chilling it overnight will yield the best texture.
– **Cover Well**: If you’re making this cake ahead of time, keep it well covered in the refrigerator to retain moisture and prevent odors.
– **Customization**: Feel free to switch up flavors by using butterscotch pudding or adding fresh fruits like strawberries or bananas between layers.
– **Cutting**: When it’s time to cut, dip the knife in hot water for easier slicing through the layers.
Common Mistakes to Avoid
While this recipe is quite foolproof, here are a few common mistakes you should watch out for:– **Not Mixing Thoroughly**: If the pudding is not mixed well with the whipped topping, you may end up with gritty layers. Ensure thorough folding until smooth.
– **Skipping the Refrigeration**: Don’t skip the chilling step! This causes the graham crackers to remain crunchy and the flavors to separate.
– **Overmixing**: Be gentle when folding in the whipped topping. Overmixing can cause the topping to deflate, resulting in a denser cake.
– **Using Cooked Pudding**: Instant pudding is key here; using cooked pudding will alter the intended texture and complexity of the cake.
– **Ignoring Ratios**: Be precise with your ingredient measurements. A slight change can impact the overall consistency and flavor of the cake.
FAQs
**Can I use other flavors of pudding?** Yes! You can substitute chocolate or vanilla pudding with flavors like butterscotch or strawberry for a vibrant twist.
**How long will the cake last?** When stored properly, No Bake Chocolate Eclair Cake can last up to 5 days in the refrigerator.
**Can I freeze No Bake Chocolate Eclair Cake?** Yes, but the texture may change once thawed. It’s best enjoyed fresh.
**Is it possible to make a gluten-free version?** Absolutely! Opt for gluten-free graham crackers to keep it deliciously gluten-free.
**Can I make individual portions?** Certainly! You can create mini versions in small cups or jars for a charming presentation. For additional meal inspirations, check out our [Slow Cooker Garlic Butter Beef with Potatoes](https://flavorfork.store/slow-cooker-garlic-butter-beef-with-potatoes-is-a-savory-tender-and-easy-meal-get-the-full-recipe-tips-and-tricks-here-today/) recipe, another easy option that will warm your heart. For necessary kitchen supplies, don’t forget to visit [Aliexpi](https://aliexpi.com/D4C) for everything you’ll need to make baking and cooking more enjoyable.
No bake Chocolate Eclair Cake
PREP
20 minutes
20 minutes
COOK
0 minutes
0 minutes
YIELD
12 Servings
12 Servings
INGREDIENTS
- 1 package (14.4 oz) graham crackers
- 1 package (3.9 oz) instant chocolate pudding mix
- 1 package (3.9 oz) instant vanilla pudding mix
- 4 cups cold milk
- 1 container (8 oz) whipped topping, thawed
- Chocolate syrup, for drizzling
INSTRUCTIONS
- In a large bowl, whisk together chocolate pudding mix and 2 cups of milk until thickened.
- In a separate bowl, whisk vanilla pudding mix and remaining 2 cups of milk until thickened.
- Fold half of the whipped topping into each pudding mixture.
- Layer graham crackers in a 9×13-inch dish, followed by half of chocolate pudding mixture, then another layer of graham crackers.
- Add half of the vanilla pudding on top, followed by another layer of graham crackers.
- Finish with the remaining chocolate pudding and graham crackers, then top with vanilla pudding.
- Cover and refrigerate for at least 4 hours or overnight.
- Before serving, spread remaining whipped topping on top and drizzle with chocolate syrup.